Inside Deep Zoom –
Part II: Mathematical Analysis
Welcome to part two of Inside Deep Zoom. In part one, I talked about the very basic ideas behind Deep Zoom and other multi-scale image technologies. Today, I'd like to continue in a more hands-on fashion and show you how to calculate the properties of the Deep Zoom image pyramid.
Anatomy of a Deep Zoom Image
When you convert one of your images, let's say with Deep Zoom Composer, into a Deep Zoom image you get an output that looks something along the lines of this:
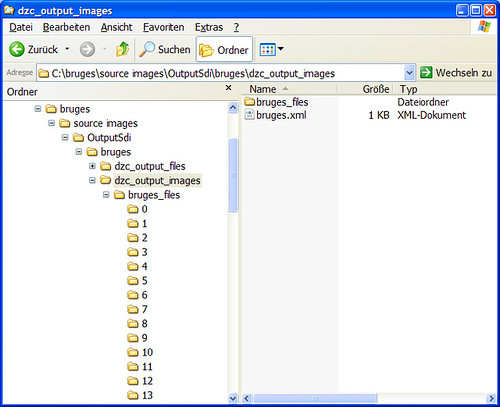
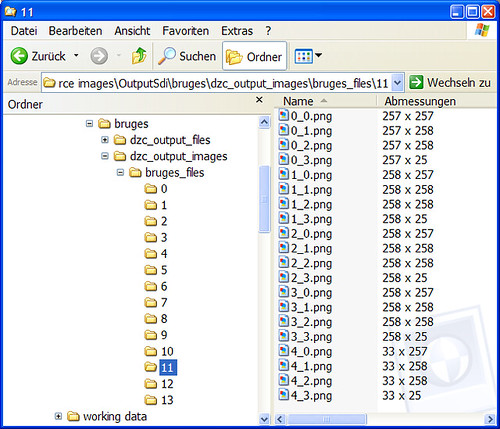
In your output folder there's a an XML file called the same as your source image and a folder with the same name and a _files suffix. The image_files folder contains the image data in different subfolders according to the levels of the image pyramid as the next screenshot illustrates:
The key to understanding how Deep Zoom generates this file structure and determines the number of levels, the size of the levels etc., is the XML descriptor file in the top-level folder.
Deep Zoom Descriptor
Let's work with this sample XML descriptor:
<?xml version="1.0" encoding="UTF-8"?>
<Image TileSize="256" Overlap="1" Format="png"
 xmlns="http://schemas.microsoft.com/deepzoom/2008">
<Size Width="4224" Height="3168"/>
</Image>
It is remarkably brief but I will show you how you can find out everything you need to know about the pyramid of your image. First, we can see that we have information about the size of the tiles that make up our image pyramid; overlap is something I will talk about later and then we obviously have the original dimensions of the image in the <Size> element.
Basically, the Deep Zoom image converter generates an image pyramid by taking the original image, dividing its dimensions by two in every step and slicing it into tiles until it reaches the lowest pyramid level with a size of 1x1 pixels.
Maximum Level
The first thing we would like to know about the image pyramid is what its maximum level is. As you may have seen in the folder structure of our sample Deep Zoom image, its maximum level is thirteen. The question is:
How many times can we divide the original size of an image by two until we end up with an 1x1 pixel image?
To answer this question we'll use logarithms. For example, how many times do you have to divide sixteen by two until you get one? The answer is four which is exactly
For determining the maximum level of a Deep Zoom image we can use the following formula
First, we take the longer side of our original image and calculate the logarithm to the base two. This answer will most likely be a real number because our original image will most probably not have a power-of-two dimension. Since we want to know how many times we have to divide until we get a dimension of 1x1 we round up the result.
Code: Maximum Level
This is the equivalent formula in code, in this case in ActionScript due to the nature of this blog, for determining the maximum level of a Deep Zoom image:function getMaximumLevel( width : uint, height : uint ) : uint { return Math.ceil( Math.log( Math.max( width, height ))/Math.LN2 ) }The division byMath.LN2comes from the fact that ActionScript's built-in logarithm function does not allow us to specify the logarithm base. Therefore we can make use of the following identitywhere log denotes the natural logarithm, accessible in ActionScript asMath.log.
Pyramid Levels
Now that we know the maximum level of our image pyramid we can go ahead and calculate the properties of our image pyramid levels with a simple loop.
Code: Pyramid Levels
Since we already know how to compute the maximum level of a Deep Zoom image pyramid, we'll go ahead and compute the dimensions of each level going from the largest to the lowest like so:function computeLevels( width : uint, height : uint, tileSize : uint ) : void { var maxLevel : uint = getMaximumLevel( width, height ) var columns : uint var rows : uint for( var level : int = maxLevel; level >= 0; level-- ) { // compute number of rows & columns columns = Math.ceil( width / tileSize ) rows = Math.ceil( height / tileSize ) trace( "level " + level + " is " + width + " x " + height + " (" + columns + " columns, " + rows + " rows)" ) // compute dimensions of next level width = Math.ceil( width / 2 ) height = Math.ceil( height / 2 ) // for bit-shift fans =) // width = ( width + 1 ) >> 1 // height = ( height + 1 ) >> 1 } }
For our sample image we'll get the following trace output…
level 13 is 4224 x 3168 (17 columns, 13 rows)
level 12 is 2112 x 1584 (9 columns, 7 rows)
level 11 is 1056 x 792 (5 columns, 4 rows)
level 10 is 528 x 396 (3 columns, 2 rows)
level 9 is 264 x 198 (2 columns, 1 rows)
level 8 is 132 x 99 (1 columns, 1 rows)
level 7 is 66 x 50 (1 columns, 1 rows)
level 6 is 33 x 25 (1 columns, 1 rows)
level 5 is 17 x 13 (1 columns, 1 rows)
level 4 is 9 x 7 (1 columns, 1 rows)
level 3 is 5 x 4 (1 columns, 1 rows)
level 2 is 3 x 2 (1 columns, 1 rows)
level 1 is 2 x 1 (1 columns, 1 rows)
level 0 is 1 x 1 (1 columns, 1 rows)
…which is identical to the output we get from the ImageTool.exe dump:
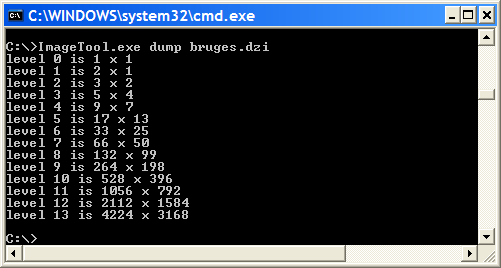
ImageTool.exe is a handy command line tool for creating Deep Zoom images and for finding out more about their structure. You find it in your Deep Zoom Composer installation folder among other tools such as SparseImageTool.exe for creating Deep Zoom collections.
Heavy Mathematics
In hindsight, calling all of this a mathematical analysis might be an overstatement, I agree. Nonetheless, I can imagine many of you are here because the title looked so delicious in your RSS reader. However, I remember well, when I first looked into multi-scale imaging in general and Deep Zoom in particular, having no prior exposure to concepts such as image pyramids and tile overlap, I was very puzzled when I saw the Deep Zoom composer output such as:
I was asking myself: How are the levels computed? Why did the actual tile sizes (second column: Abmessungen) seemed to look so irregular? I knew I was not the only one when I found blog posts such as A deepzoom primer (explained and coded) by Jaime Rodriguez, a Microsoft blogger:
A few of the docs I read said the tiles are 256x256, but from peeking through the files generated by the composer I am not convinced; I do know from reading through the internal stuff that there is some heavy math involved here, so I trust they tile for right size :).
As you will realize, nothing in here involves heavy math. Nevertheless, it does take some time to put all the pieces together. The information I present you here are things I learned from playing around with Deep Zoom and wished to be around back then. Although there exists an official Microsoft Deep Zoom File Format Overview, it does not nearly go into as much detail as you find here. Finally, as I couldn't find this background information, I've decided to write it up in this series called Inside Deep Zoom and share it with people interested in finding out more about this technology.
258 x 25
Alright, so let's find out what's behind the seemingly weird numbers that are produced by Deep Zoom Composer. It's actually very easy and has to do with something called tile overlap:
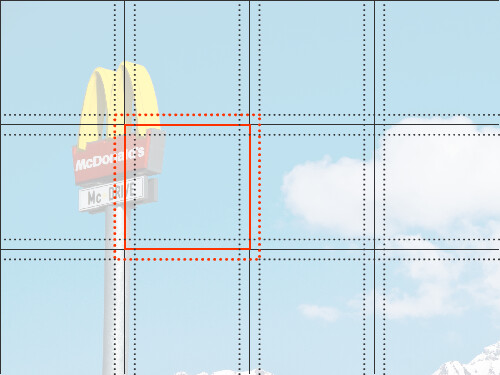
Have a look at the highlighted tile. The solid red outline is the actual tile at this position with a size that is defined in the XML descriptor. In our case this is 256 by 256 pixels. Now, what Deep Zoom Composer does is, it actually extends the dimensions of a single tile by adding some pixels of its neighboring tiles (dotted red outline.) How many pixels that is, is also defined in the XML descriptor as Overlap attribute of the Image element. By default, Deep Zoom Composer gives each tile an overlap of one pixel. If you use the command line tools ImageTool.exe or SparseImageTool.exe, both located in your Deep Zoom Composer installation folder, you can specify your own value for tile overlap as something between zero and ten pixels.
One thing I'd like you to notice is the special role of tiles in the corner as well as on the edges. Whereas regular tiles have overlap on all four sides, corner tiles only have overlap on two sides and analogously edge tiles on three sides. This explains all the seemingly strange numbers that come up when you look at the dimensions of the tiles of a certain level.
As to the question of why Deep Zoom uses tile overlap, I cannot conclusively answer it, as I've never developed for Microsoft Silverlight and don't know enough about its rendering engine. Having said that, one thing I've observed in Flash though is that when you reconstruct large images from much smaller image tiles, sometimes there are visible artifacts between the tiles which most probably stem from rounding errors in their positioning. This problem is greatly alleviated by using overlap between the tiles. Due to the similar nature of Flash & Silverlight, I can imagine a similar motive behind using tile overlap in Deep Zoom.
Accessing & Positioning Tiles
One of the last things I want to look at is how to access the right tiles…
Code: Accessing Tiles
Getting the URL for a given tile is pretty straightforward when we have the URL to a Deep Zoom descriptor XML:function getTileURL( level : uint, column : uint, row : uint ) : String { // source: Path to the Deep Zoom image descriptor XML // extension: Image format extension, e.g <Image … Format="png"/> return source.substring( 0, source.length - 4 ) + "_files/" + String( level ) + "/" + String( column ) + "_" + String( row ) + "." + extension }
…and how to calculate their position within a certain pyramid level:
Code: Positioning Tiles
The following function calculates the position of a tile within a image pyramid level taking into account the tile size as well as the tile overlap:function getTilePosition( column : uint, row : uint ) : Point { var position : Point = new Point() // tileSize: Dimensions of tile, e.g <Image … TileSize="256"/> // tileOverlap: Overlap in pixels, e.g. <Image … Overlap="1"/> var offsetX : uint = ( column == 0 ) ? 0 : tileOverlap var offsetY : uint = ( row == 0 ) ? 0 : tileOverlap position.x = ( column * tileSize ) - offsetX position.y = ( row * tileSize ) - offsetY return position }
Redundant?
Before finishing part two of Inside Deep Zoom, I'd like to talk about one more thing which does not really have to do with anything above but is nevertheless interesting, mathematical and perhaps even a little bit of a surprise.
Last time I introduced you to image pyramids, this time I showed you how Deep Zoom calculates & structures its pyramid. By now, I hope you've come to appreciate the benefits the image pyramid provides us with for efficiently viewing high-resolution images. The question now is:
How much more space does it really take to store an image pyramid compared to simply storing the original sized image?
Although, again, the calculation is not very hard and is based on some simple principles, I was nevertheless surprised by its outcome. For the following calculation I will make some simplifying assumptions, such as taking out the impact of image compression and other factors on file size.
Calculation: Redundancy of an Image Pyramid
Single Image
If we assume that the file size of an image is solely given by the image dimensions (w for width & h for height) we get the following result for a single image:
Image Pyramid
For a Deep Zoom image which is power-of-two based we get the following:To solve this equation I've used a geometric series.
In my opinion quite surprising, is the fact that storing an image pyramid of base two only requires 33% more space than simply storing the original image.
Deeper and Deeper…
After a rather basic introduction to multi-scale imaging in part one of Inside Deep Zoom, I hope you gained more insight in this second part and got a better understanding on what's going on behind the scenes. Be sure to come back for part three where I will wrap-up everything I talked about so far, show off some cool demos as well as give an outlook on where Deep Zoom & Co. could take us.
Further Reading
- Jaime Rodriguez:A Deep Zoom Primer (Explained and Coded)…
- Microsoft: Deep Zoom File Format Overview
- Microsoft: Deep Zoom
- Wikipedia: Geometric Series
- delicious: Daniel Gasienica's bookmarks tagged Deep Zoom